
JAN's History
JWT를 구현하기전, 인증/인가 동작 원리: FilterChain을 이해해보자! 본문
JWT을 위한 Filter를 구현하기 전, Spring SecurityFilterChain를 제대로 짚고 넘어가는 것이 좋을 것 같아 힘이 닿는데까지 공부해보기로 했습니다!
Spring에서 JWT 필터 구현의 필요성?
JWT를 하는데 왜 필터를 구현해야하는지 묻는 분들을 위해 이 부분도 짚고 넘어가려고해요! (제가그랬기 때문..)
JWT(Json Web Token)은 HTTP프로토콜을 따라 stateless한 방식으로 인증을 처리합니다. 그렇다보니, 로그인 상태를 유지하기 위해 나온 것이 바로 JWT토큰이었는데요! 서버가 세션 상태를 유지할 필요 없이 클라이언트가 요청 시마다 JWT를 포함해 인증을 수행하며 인증과 인가를 처리하고 있었습니다.
이를 위해 커스텀 필터를 구현해야하는 이유는 다음과 같아요.
1. 요청 인터셉트
- 모든 요청을 인터셉트해 JWT를 확인하고, 유효한 경우 인증된 사용자로 설정하기 위해 필요합니다.
- Spring Security는 요청이 들어올 때마다 필터체인을 통해 요청을 처리하는데요. 이 과정에서 JWT를 검증하고 인증 정볼르 설정하려면 필터를 구현해야합니다.
2. 토큰 검증
- JWT가 요청 헤더에 포함되어있는지 확인하고, 이를 검증해 유효성을 확인하는 역할을 합니다.
- 유효한 JWT가 있다면 사용자 정보를 추출하고 이를 SecurityContext에 인증된 사용자 정보를 설정합니다.
3. 인증 및 권한 부여
- JWT가 유효한 경우, 해당 사용자의 권한을 설정해 접근을 제어합니다.
- 필터를 통해 인증된 사용자의 정보를 설정하면, 이후 권한 부여 과정에서 이를 활용할 수 있습니다.
Spring Security Filter Chain BIG Picture🙌🏼

Spring Security는 위와 같이 여러 개의 필터를 체인 형태로 연결해 요청을 처리하는데요!
이 체인을 SecurityFilterChain이라고 합니다. SecurityFilterChain은 여러개의 필터로 구성되며 각 필터는 특정 보안 기능을 처리하는 역할을 담당하고 있어요.
필터들은 위 그림처럼 정해진 순서대로 요청을 처리하며, 각 필터는 필요한 경우 요청을 처리하고 다음 필터로 요청을 전달합니다. 이를 통해 인증과 인가를 포함한 보안 전반을 처리할 수 있게 됩니다.
DelegatingFilterProxy 동작원리

1. DelegatingFilterProxy 가 Servlet Container 로 넘어온 사용자의 요청을 받습니다.
2. DelegatingFilterProxy 는 SpringSecurityFilterChain 이름으로 생성된 Bean 을 ApplicationContext 에서 찾습니다.
3. Bean 을 찾으면 SpringSecurityFilterChain 으로 요청을 위임합니다.
이렇게 DelegatingFilterProxy 로 부터 요청을 위임받은 SpringSecurityFilterChain 은 각각의 filter 들에게 순서대로 요청을 맡기며 각각의 필터들이 체인으로 연결되어 수행 -> 넘김 -> 수행 -> 넘김 으로 진행됩니다
FilterChainProxy
DelegatingFilterProxy 으로 부터 요청을 넘겨받은 SpringSecurityFilterChain 빈은 FilterChain 의 역할을 하는 FilterChainProxy 입니다.

해당 이미지는 초기화 부터 시작해서 사용자의 인증 요청이 DelegatingFilterChain 을 거쳐 어떤 filter 을 거쳐 인증/인가가 성공하는지를 보여줍니다.
지금부터, Filter Chain 을 구성하는 대표적인 4가지 filter 을 하나씩 살펴보겠습니다
1.SecurityContextPersistenceFilter

SecurityContextRepository 에서 SecurityContext 을 가져오거나 생성하는 역할
사용자의 요청이 DelegatingFilterProxy 을 거쳐, 처음으로 SecurityContextPersistenceFilter 을 만나게됩니다.
이 필터는 SecurityContext 을 영속화 하고 해당 과정은 SecurityContextRepository 에서 이루어집니다.
별도 변경이 없다면 HttpSessionSecurityContextRepository 가 사용되며 HttpSession 의 Attribute 에 SecurityContext 가 저장됩니다!
SecurityContextRepository 는 인터페이스이며 이를 구현한 클래스가 HttpSessionSecurityContextRepository 입니다
SecurityContext 란?
Authentication(인증된 객체) 가 저장되는 저장소이며, 일반적으로 ThreadLocal 에 저장되며 덕분에 전역적으로 SecurityContext 접근 가능합니다.

SecurityContext 는 필터를 거쳐 인증 완료된 인증 객체를 저장하기 위한 객체입니다.
setAuthentication() 메소드를 통해 Authentication 을 설정할 수 있습니다.
SecurityContextHolder란?
SecurityContext 을 감싸는 객체이며 실제 SecurityContext 을 위한 ThreadLocal을 가지는 객체입니다.
getContext() 메소드를 통해 감싸고 있는 SecurityContext 을 가져올 수 있고 clearContext() 을 통해 초기화 할 수 있습니다.
SecurityContextPersistenceFilter 을 거치는 순간 SecuriryContextRepository(= HttpSessionSecurityContextRepository) 에서 SecurityContext 을 가져오는데, 여기서 2가지 경우로 나뉩니다.
✅ 처음 인증하거나 혹은 익명 사용자일 경우
- 세션에 저장된 것이 없을 테니 새로 SecurityContext 을 생성하고 SecurityContextHolder 안에 저장을 하고 다음 필터를 실행합니다.
✅ 인증 이력이 있는 경우
- 이미 있는 SecurityContext 을 가져와서 SecurityContextHolder 에 저장합니다.
➡️처음 인증 시, SecurityContextPersistenceFilter 는 이후의 모든 필터 동작들이 종료 된 후, 다시 자신의 실행흐름으로 돌아와, 인증 완료된 Authentication 객체가 존재할 경우, 이를 SecurityContextRepository 에 저장합니다. - 이렇게 SecurityContext 가 SecurityContextHolder 에 저장된 후, 다음 필터로 진행이 이어지며, 추후 인증이 안료되면SecurityContextHolder 을 통해 Authentication 객체를 SecurityContext 에 저장합니다
2. LogoutFilter
이름 그대로 로그아웃을 처리하는 필터입니다.
LogoutFilter 는 로그아웃에 대한 처리를 담당하는 필터로 사용자가 로그아웃 요청을 했을 경우에만 적용되는 필터입니다.
이 필터는 세션 무효화, 인증 토큰 삭제, SecurityContext에서 해당 토큰 삭제 등 로그아웃시 필요한 다양한 기능을 제공합니다
3. UsernamePasswordAuthenticationFilter
Form Based Authentication(폼 기반 인증) 을 위한 인증 필터입니다.
UsernamePasswordAuthenticationFilter 란 Form Based Authentication 방식으로 인증을 진행할 때 아이디, 패스워드 데이터를 파싱하여 인증 요청을 위임하는 필터입니다.
여기서 폼 기반이란 사용자가 입력한 인증 정보인 username 과 password 을 통해 인증을 하는 방식으로 요청의 Content-type 은 일반적으로 application/x-www-form-urlEncoded 입니다.
- application/x-www-form-urlEncoded : 미리 인코딩 되어 전달되는 객체
- application/json : key-value값으로 전달된 후 인코딩 되는 객체
➡️즉, 유저가 로그인 창에서 로그인 시도를 할 때 보내지는 아이디와 패스워드 데이터를 가져온 후 인증을 위한 토큰을 생성 후 인증을 다른 쪽에 위임하는 역할을 하는 필터입니다.

UsernamePasswordAuthenticationFilter 로직
1. form 기반 인증인 경우, Spring Security에 대한 기본 구조인 AuthenticationManager,AuthenticationProvider,
UserDetailsService 등 Spring Security에서 제공하는 클래스 및 인터페이스를 이용해 인증을 시도합니다.
2. Security에서 제공하는 클래스 및 인터페이스를 이용해 인증을 시도합니다.
여기서, UsernamePasswordAuthenticationFilter 에서 처리할 수 있는 AuthenticationProvider는 Dao AuthenticationProvider입니다.
Spring Boot 기반의 HttpSecurity 를 설정하는 코드에서 http.formLogin() 을 하는 경우 기본적으로
UsernamePasswordAuthenticationFilter 을 사용하게 됩니다 ❗️
이때는 Sprng Security 에서 제공하는 기본 로그인 페이지가 나옵니다.
@Override
protected void configure(HttpSecurity http) throws Exception {
	http.formLogin(); // UsernamePasswordAuthenticationFilter 을 거치게 된다.
}
하지만 서버의 인증 방식에는 폼 기반 인증 방식외에도 자주 사용되는 다른 방식이 존재합니다. 현재 가장 많이 쓰이는 API 기반 인증 방식(API-Based Authentication) 는 요청 본문의 Json 데이터를 통해 인증을 시도하는 방식입니다. API 기반 인증 방식은 현재 가장 많이 사용되는 인증 방식입니다. 이럴때에는 폼 기반 인증을 비활성화 해야겠죠?
이때 http.formLogin().disable() 을 하면 됩니다 .
@Override
protected void configure(HttpSecurity http) throws Exception {
	http.formLogin().disable()
    		// Jwt 을 통한 인증방식을 사용하는 JwtAuthenticationFilter 을 사용한다.
    		.addFilterBefore(jwtAuthenticationFilter,new UsernamePasswordAuthenticationFilter(CustomAuthenticationFilter())
            ...
}
또한 폼 기반 인증 방식처럼 Spring Security 에서 기본적으로 제공하는 필터가 존재하지 않기에 개발자가 직접 인증 필터를 구현해야합니다.

public Authentication attemptAuthentication(HttpServletRequest request, HttpServletResponse response) throws AuthenticationException {
        if (this.postOnly && !request.getMethod().equals("POST")) {
            throw new AuthenticationServiceException("Authentication method not supported: " + request.getMethod());
        } else {
            String username = this.obtainUsername(request);
            username = username != null ? username : "";
            username = username.trim();
            String password = this.obtainPassword(request);
            password = password != null ? password : "";
            UsernamePasswordAuthenticationToken authRequest = new UsernamePasswordAuthenticationToken(username, password);
            this.setDetails(request, authRequest);
            return this.getAuthenticationManager().authenticate(authRequest);
        }
    }
해당 코드는 UsernamePasswordAuthenticationFilter 내부의 attemptAuthentication 메소드입니다.
request안에서 username, password 파라미터를 가져와서 UsernamePasswordAuthenticationToken 을 생성 후 AuthenticationManager을 구현한 객체에 인증을 위임합니다 ❗️
1. HttpServletRequest 객체에서 getParamter() 메소드를 통해 Username, Password 정보를 가져온다.
2. 해당 정보를 통해 Authentication 인터페이스를 구현한 인증 전 객체 UsernamePasswordAuthenticationToken 을 생성한다.
3. 인증을 위해 AuthenticationManager 의 authenticate 메소드를 호출하여 인증을 시도한다.
4. ExceptionTranslationFilter
FilterChain 을 거치면서 발생하는 예외를 처리하기 위한 용도의 필터입니다.
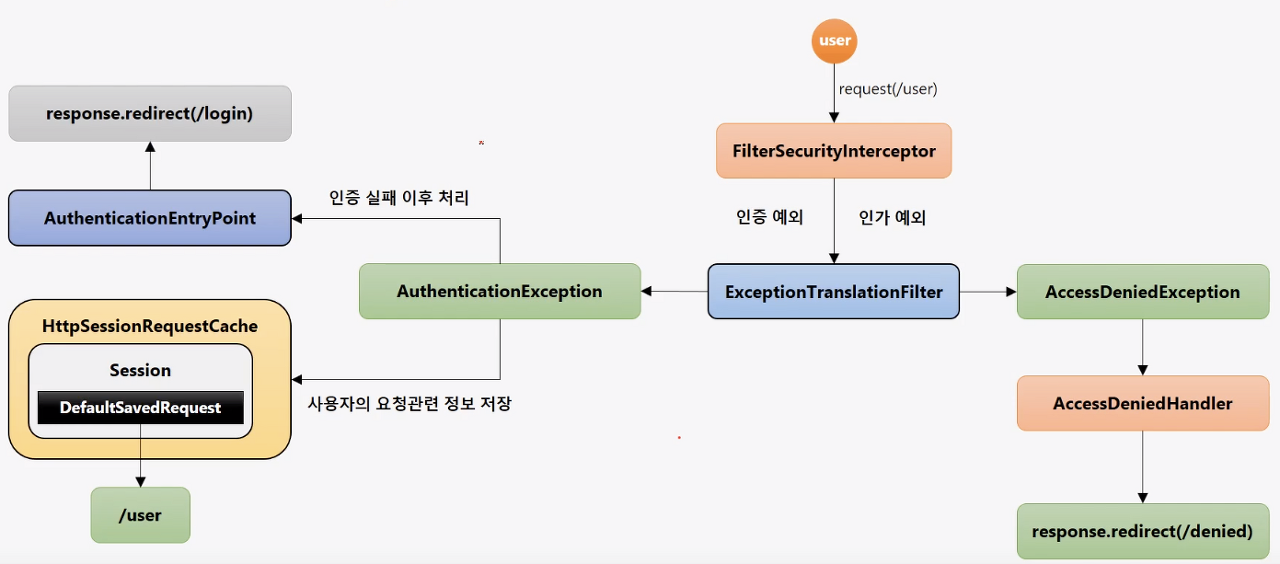
해당 이미지는 FilterChain 을 거치는 동안 발생하는 예외를 처리하는 ExceptionTranslationFilter 의 동작 과정을 보여주는 이미지입니다. 로그인시 발생할 수 있는 예외는 크게 두가지로 구분할 수 있습니다.
- AuthenticationException : 인증 예외 처리
- AuthenticationEntryPoint 호출
: 인증이 실패했을 때 어떻게 handling 할지를 결정합니다.
로그인 페이지로 리다이랙트, 401(Unauthorized) 상태 코드 등의 작업을 수행할 수 있습니다. - RequestCache 와 SavedRequest
: RequestCache 와 SavedRequest 는 이름에서 알 수 있듯이, 요청에 대한 정보를 기록하기 위한 용도로 사용합니다.
로그인 전 어떤 URL 로 접속했는데 인증이 안되어서 로그인 페이지로 가는 경우, 사용자가 접근한 정보를 RequestCache 와 SavedRequest 에 담아두었다가, 사용자가 로그인하면 담아둔 정보를 바탕으로 사용자가 인증 안되었을 때 요청했던 자원을 전달해주는 방식입니다.
RequestCache 에는 클라이언트의 요청 정보를 저장하며, SavedRequest 는 요청의 파라미터,헤더를 저장합니다.
- AuthenticationEntryPoint 호출
2. AccessDeniedException : 인가 예외 처리
- AccessDeniedHandler 호출
: 요청 자원에 사용자의 권한이 없는 경우 예외처리를 위한 Handler 입니다.
'JWT' 카테고리의 다른 글
| JWT 임시 토큰으로 필터 테스트 (0) | 2024.07.06 |
|---|---|
| JWT를 구현하기전, Filter 등록 테스트 (0) | 2024.07.04 |
| JWT Basic, Bearer 인증 방식 (0) | 2024.07.01 |
| JWT를 사용하기 위한 security config 세팅 (0) | 2024.06.30 |
| JWT의 구조 이해하기 (0) | 2024.06.28 |


